How to work with non printing characters in Microsoft word
SHARE
In this tutorial I explain everything you need to know about non printing characters in Microsoft word. You will learn how to show and hide non printing characters, remove a blank page,section breaks or column breaks and insert non printing characters for better organizing of your word document. Even though it is based on Microsoft word it should be compatible with other office suits like Libre Office and Open office. Following topics are covered in this tutorial. If you are a beginner you can go through the whole tutorial on non printing characters or else you can easily jump into desired topic right away by clicking on the topic.
- How to Show and Hide non-printing Characters in Word
- List of useful non-printing characters in word
- How to remove non-printing characters such as page breaks, section breaks and column breaks
- Removing non-printing characters by using find and replace option
- Useful Character Combinations for use in "Find and replace" option for removing or replacing page breaks,section breaks or any other non-printing character
How to Show and Hide non-printing Characters in Word
what option will display the nonprinting characters such as tabs, spaces, paragraph marks, and breaks? - You need to click "Show/Hide Paragraph marks and other hidden symbols" button to display or hide those non printing characters.Go to Home tab ->> Click (![]() ) icon in paragraph command group.You will see suddenly a new set of characters appear within the document.
) icon in paragraph command group.You will see suddenly a new set of characters appear within the document.
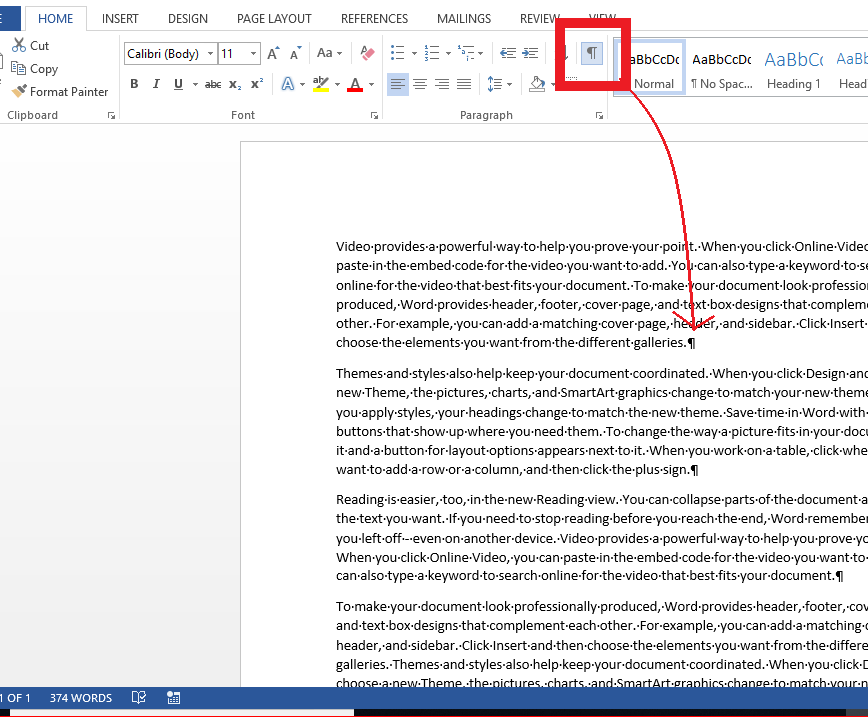
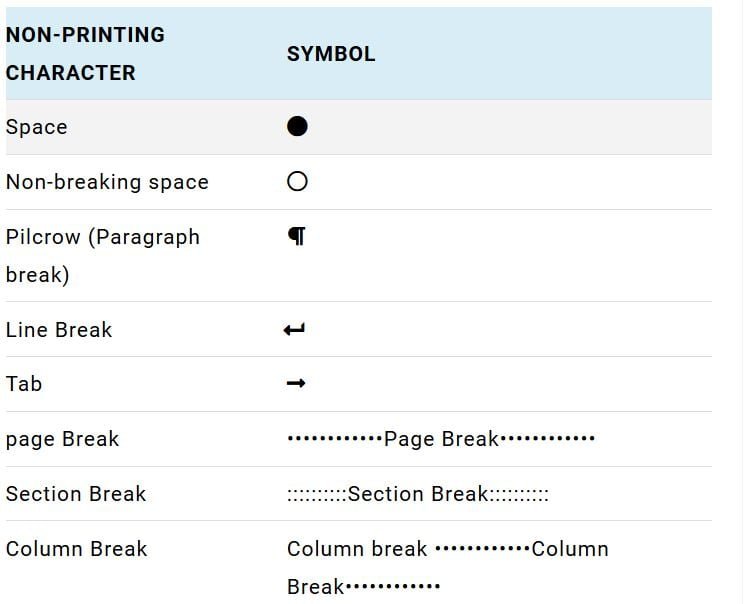
Those that represent the types of non-printing characters we discusses previously. You can identify each of the non-printing character from its symbol which I have shown in the following table.
List of useful non-printing characters in word
Space
Everyone knows what a space is. We keep a space between words to separate them. Without space there is no sentences, only the words. So I do not need to explain the importance of the "space" character. You have to press space bar or space key to insert a space in any of the word processing program like Microsoft office, Libre Office, Open Office, and WPS or even in your text messaging app.
Non Breaking Space or nbsp
Do you know what this “non breaking space” is? Before understanding the “non breaking space” have you noticed that if you are typing a word at the end of a line, it suddenly jumps to next line without any involvement of yours’ even if you do not need this to happen? You need this word to be there with the previous word in a single line without jumping to next line alone. To achieve this we can use a “non breaking space”. To insert a non breaking space you have to press ‘Ctrl’ and ‘Shift’ key altogether with ‘Space’ key in Microsoft office, Libre office or Open office. You would not see any difference of a normal space or non-breaking space unless it is possibly before the last word of the line and the last word does not have enough space to fit into current line you are typing. If that happens the last word you were typing will jump to the next line accompanied with the word just before it (A non-breaking space should be there).
Pilcrow / Paragraph mark ( )
)
Do not worry that you have not heard the “Pilcrow”. It is the technical term for paragraph mark. Paragraph marks use to end a current paragraph and start typing from a new paragraph. You can press “Enter” key in Microsoft Office, Libre Office or Open Office to insert a paragraph break.
Line Break
What do you do if you want to start typing from next line but does not like to begin a new paragraph? If you press “Enter key” line spacing will change and technically a new paragraph begins. Therefore you need to press “Shift + Enter” key combination in Microsoft office, Libre Office or Open Office. It will move the cursor to next line keeping the line spacing normal as in between 2 lines of a same paragraph.
Tab character
In a standard keyboard there are three main keys merely designed for few non printing characters we are discussing here. They are “Space” key, “Enter” key and “Tab” key. I do not have to explain the importance of “Enter” key and “Space” key again. You know it is widely used in Microsoft word, Libre Office and Open Office.
What about the “Tab” key. I feel that Most of us do not use it enough. If you press “Tab” key you can see that the cursor moves a multiple-space distance at once and you can start typing from there.
Move to next line and do the same. If you have not altered default tab stops you see that all the tab stops are vertically aligned to tab stops in previous line. According to Microsoft the default distance between two tab stops is half-an-inch. You can use this tab stops to group a simple word list vertically aligned in few columns or start typing from a definite distance from the margin.
Page Break
This is actually one of my favorites and also a problem maker. Some of you might wonder how to delete a blank page in word.Blank page occurs due to two main reasons.
- Multiple paragraph marks inserted by pressing enter key
- Due to the presence of a page break
You can remove a blank page in word by removing page break or deleting paragraph marks. Please read further for more on this. Page break allows you to end the content (break content) in one page at your desired position and start the next page. You can press “Ctrl”+”Enter” keys to do this.
If your current chapter ends at the middle of a page and you need to start your next chapter it is always better to use page break rather than pressing “Enter” key continuously until the cursor moves to next page.
The good thing about page break is if you add more content to the preceding chapter to the page break, partially filled page will be filled until that page completely filled instead of the moving down the content in the bottom page.
Then suddenly you will notice that the content after page break will move to next page making an empty page in between. The reason for that is when the page before page break completely filled, page break automatically moves to next page. Therefore we have to remove that page break to remove the empty page. I will tell you how to remove page break later.
Section Break
Section breaks are important for mainly;
- Organize the document to separate parts having different formatting such as numbering system, separate headers or footers, columns, page borders etc.
- Having parts with different page layout and orientation
If you want to add a section break, Go to Page Layout Breaks Section Breaks Select one of the section break types depending on your requirement.
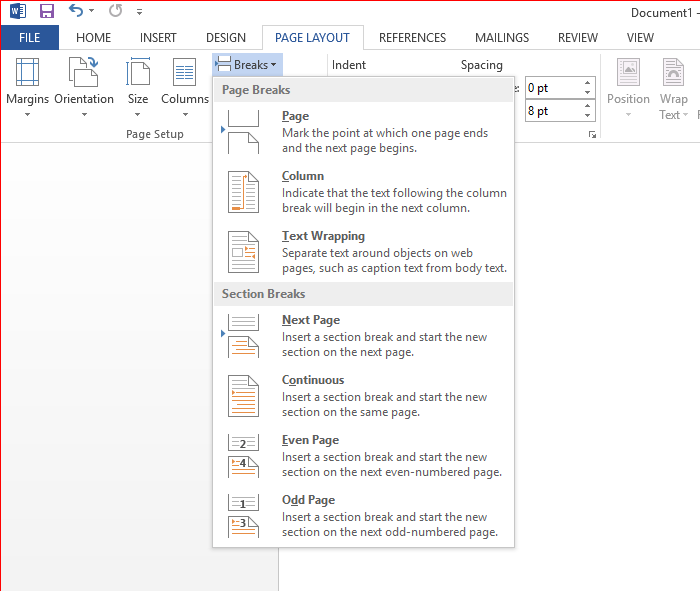
Mainly there are four types of section breaks,
- Next Page
- Continuous
- Even Page
- Odd page
You should select the one that mostly suitable for your requirement. Next Page: It is the type we use commonly. If you insert a section break at the current page it does create a new section from the next page.
Continuous: If you insert section break new section begins within the same page just after the section break. Most common usage is to change number of columns within a page.
Even Page: When you insert an even page section break, new section starts from the next even numbered page
Odd Page: Similar to even page section break, the odd page section break starts the new section from the next odd numbered page.
Column Break
This type of break only helpful if you use columns in your document. When you use multiple column layout for your document, the content will be filled from top to bottom of left most column and then moves to next column to fill from top to bottom. If you wish to start writing from the next column without continuing the previous column, you can insert a column break.
How to remove non printing characters such as page breaks, section breaks and column breaks
Usually we have to identify the location of the character to delete it. As we cannot see non-printing characters in usual view it might be difficult locate them.
Space, paragraph break, line break and tab can be deleted simply by using “backspace” or “delete” key because we know where they are from our experience.
But it is not the case for page breaks, section breaks and column breaks. It is required to have made the “non printing characters” visible as explained above.
Then you can place the cursor after the break and press “Backspace” or place the cursor just before the break and press “Delete” to remove them.
If you are working with a document especially when you are not the one who created it, you might find that some of the page breaks, section breaks or column breaks are very hard locate and remove even if you turn on the visibility of non-printing characters. Then there is another method to remove them as explained below.
Removing non printing characters by using find and replace option
Using “Find and replace” option in Microsoft word to remove non printing characters is very easy.
This feature can be used especially if you need to remove multiple page breaks, sections breaks, column breaks or any other non-printing characters simultaneously or at once.
Here you should be very careful when removing section breaks, page breaks or column breaks as it could damage the intended formatting or page arrangement.
Therefore consider taking the following measures before using “Find and replace” to remove breaks in a word document.
- Turn on the visibility of non-printing characters by pressing show/hide button ()
- Try to understand what could happen if you delete those page breaks, section breaks, column breaks or even paragraph marks.
- Better not to choose “Replace All” option in “Find and Replace” if you do not have a good understanding of what could happen if you delete all the characters at once. If some-thing went wrong do not panic just undo (“Ctrl”+”Z”)
- When you are removing section breaks you might need to replace them with page breaks to maintain the flow of the document content.
Now let us see how to use “Find and replace” option.
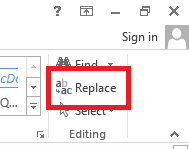
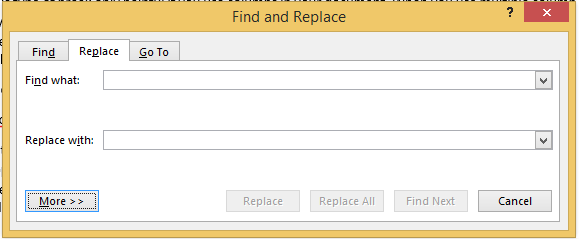
Step 01 : Open the Find and Replace dialog box
If you want to open the “Find and replace” dialog box;
- Go to Home
- Find "Editing" Command Group and then click "Replace"
Alternatively you can press “Ctrl”+”Key” key combination in windows to open the Find and Re-place dialog box.
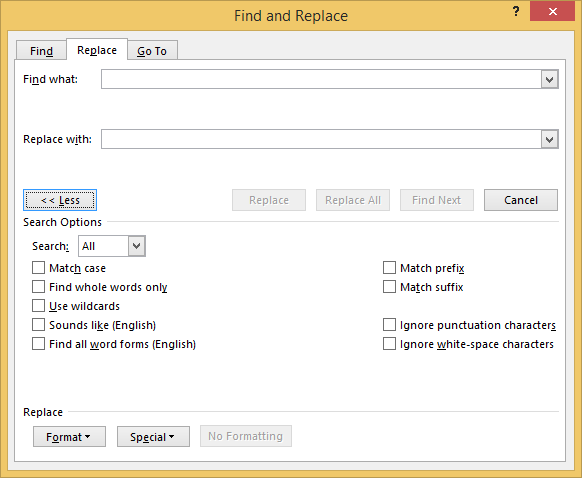
Step 02 : Click “Special” button to find the available types of characters.
Click “More ...” Button to expand the options in “Find and replace” dialog box.
Now click the “Special” button in the expanded view of the “Find and Replace” dialog box.
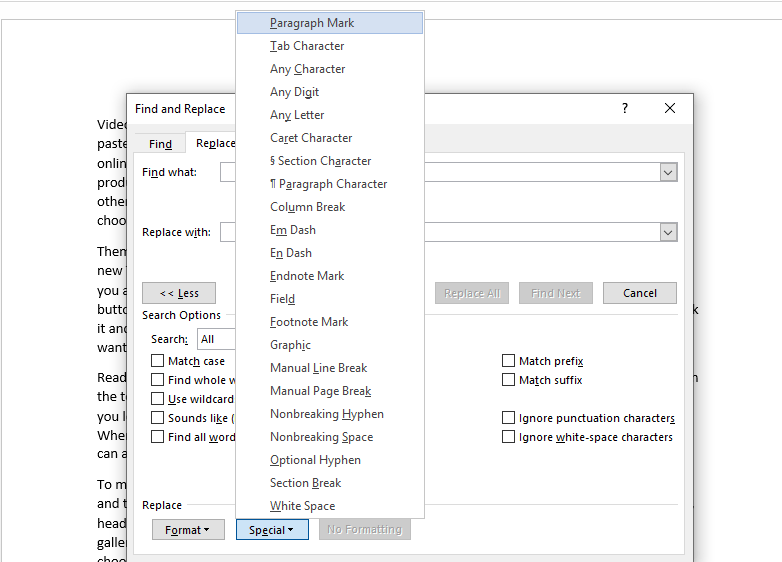
We can see a popup list of around twenty characters we can choose to find within the Microsoft word document. You can choose any of the characters in the list but again remember to be careful what you are going to replace or delete.
Step 03: Choose required type of character from popup list
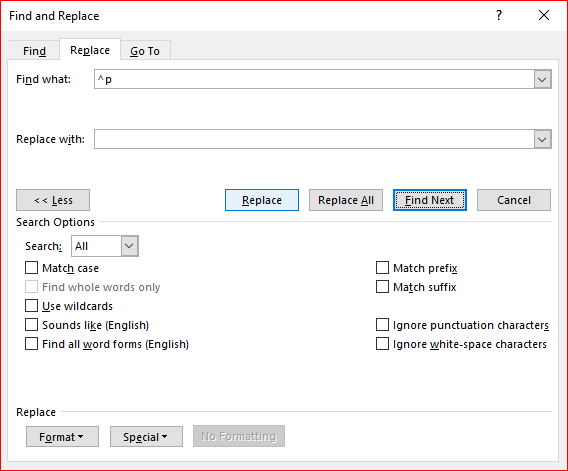
Let us assume that you want to remove all the paragraph breaks in your document at once. To do that choose “Paragraph Mark” in the popup list. It will insert “^p” in the “Find what” text box.
Step 04: Click “Replace All” button to remove all at once or “Replace” button to remove one by one.
To remove all the paragraph breaks at once click “Replace All”. Otherwise if you want to remove paragraph breaks one by one, just click “Replace” button. It is possible that sometimes you do not need just removing but replace with some other character like page break. In a situation like that you have to select a required type of “character” into “Replace with” text box.
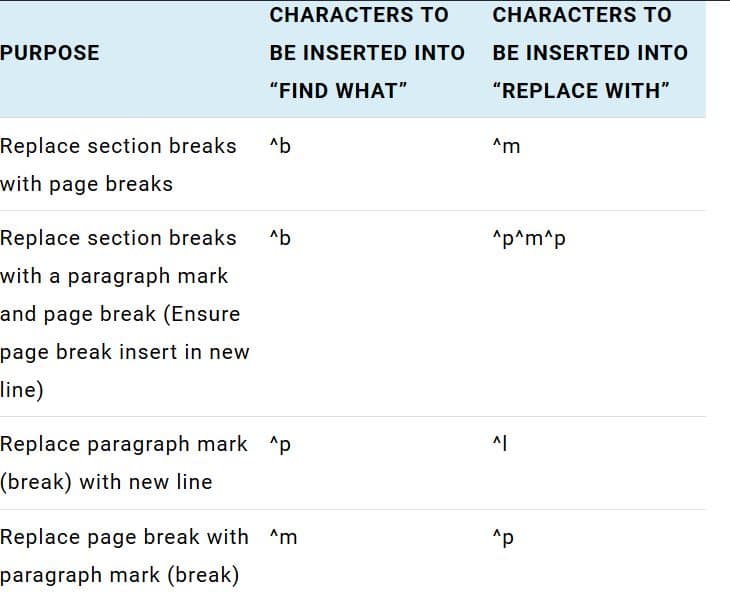
You can find few useful “Find and Replace” combinations in the following table.
Useful Character Combinations for use in "Find and replace" for removing or replacing page breaks,section breaks or any other non-printing character
References:
SHARE