View code in excel macro and easily modify as you wish
SHARE
What is excel macro code?
Codes for excel macros are written in the programming language called as “Visual Basic for Applications” or commonly knows “VBA”.
You can build simple macros for tasks like highlighting the selected cell texts to more advanced programs for automatic chart generation, data analyzing, report generation and printing, interact with other Ms Office programs such as Access, word, Outlook etc.
Why do you need to view the code in excel macr
You will be able to fine tune your recorded macro in excel to improve it functionality, improve its execution speed by removing unwanted commands, modify the macro to get different outcome and add new commands.
In addition, you can extract and combine together source codes from simple macros to build more complex macro programs like data entry dashboards, automation of routine tasks etc.
How to view excel macro source code?
Basically you can view the code in excel macro using following three methods.
- Go to “View” tab → “Macros” group → Click “View Macros” command button
Macro dialog box appears.
Select the macro that you to see the code and then click the button called as “Step into”.
- Press “Alt” + “F11” keys of the keyboard
- If you have enabled the “Developer” tab,
Go to “Developer” tab → “Code” group → Click “Visual Basic” command button
Any of the above three methods used to view the code for excel macro would launch the “Visual Basic Editor” window.
Visual Basic Editor in Excel
You will be writing all your code in excel macro within visual basic editor in excel. This contain few more windows positioned within the main window.
Main windows are,
- Code
- Project Explorer
- Properties window
You can easily customize the visual basic editor by re-arranging the positioning of each window and by resizing. You can also close the windows if you don’t need them.
You do not have to worry as you can get them back easily.
If you find any of the required window is missing in visual basic editor (VBE),
- Click the “View” menu of the visual basic editor window.
- Then click the menu item for required window from appeared drop down menu to show them.
All the macros you recorded are stored within the components called “Modules”.
If you look at the “Project Explorer” window, there is a separate VBA project and a tree diagram for the components of each opened excel files which are visible or hidden.
Expand the tree diagram branches by clicking “+” symbol. Available modules for each active excel workbook can be found under a folder called “Modules”.
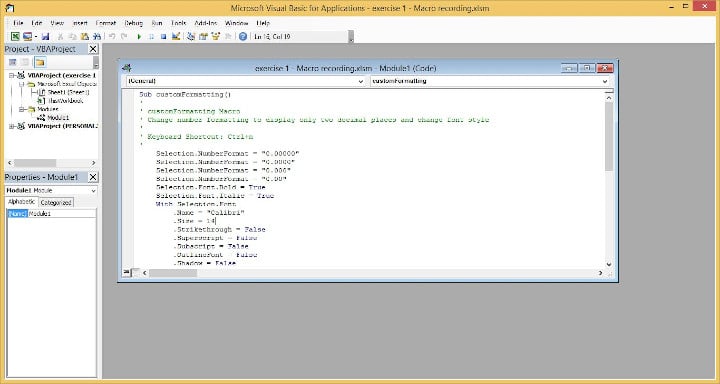
Source code of the recorded macro
Now if you have followed all the steps as I told you, you should get a window like this. If you have more than one macro recorded within your workbook, this might be slightly different.
In my code window I see some lines of codes starting as;
Sub customFormatting ()
Here I am using the same workbook I used for last tutorial – How to create a macro in excel 2016? .
“customFormatting” is the name I gave for the recorded macro.
If you couldn’t find the expected macro name within the code window or there is no any code at all, please check if there are more than one module listed under the modules folder in “Project Explorer” for the workbook you are currently working.
If there are more than one module listed, you can simply click each of them to see the codes written within those modules.
Now let us see what is written in code for excel macro we recorded.
Can’t you understand anything? Don’t worry! Even I couldn’t understand this at first. Just take it easy and go through the lines of code.
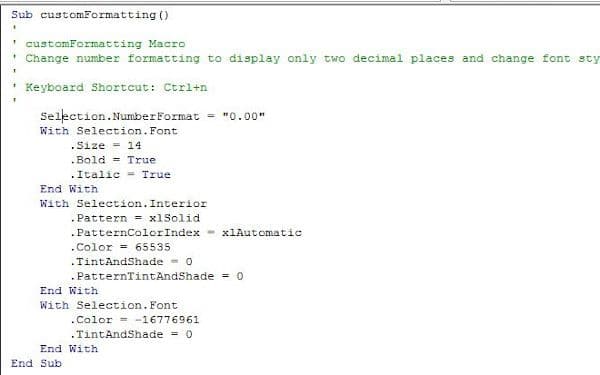
The green color text placed on top part of the code are comments, which are purely placed you to understand or recall useful information about the code.
Comment lines starts with an apostrophe (‘).
You also can enter comment lines in this way.
Now we can move into the actual code which does the magic.
Before that let’s see what specific tasks or commands we executed during recording of the macro.
- Apply Number formatting to round them off to two decimal places.
- Then change font styles to “Bold Italic”.
- Change font size to 14.
- Change the cell background color to Yellow.
- Change font color to red.
It is easy to understand the vba code knowing above sequence of action we carried out.
We can divide the code into five parts representing relevant actions.

Now let’s decode this vba code,
Part 01:
First part sets the “NumberFormat” property of the selection (selected cell) to “0.00”, which two decimal places.
There three unnecessary lines of code recorded by the macro recorder.
We need only the line of code which sets number format to two decimal places. Therefore, delete the first three lines.
Part 02:
In this second part vba code make font “Bold” and “Italic”.
If we further elaborate what this line of code does is set the “Bold” and “Italic” properties of the font located within the selection (selected cell) to “true”.
There many more properties of “font” you can access through vba code. Some of them are present in the next part of code.
Part 03:
In the third part we just set the font size property to 14.
But there are lot of font properties are unnecessarily used here. So we can safely remove all the lines except which set size property in this group.
Here you see vba has used new structure called “With” statement to group and combine multiple property settings of a vba object like “font”.
Since the “Bold” and “Italic” both are also properties of “font” object we can put those property settings also within above “With” statement as shown below.
These small changes make your code cleaner and execute faster.
Part 04:
In this part of the code vba changes cell background to yellow. In speaking of vba terms, it sets the “color property” of the “Interior (cell background)” of the “Selection (selected cell)”.
This block of code also written inside “With” statement. This section only modifies one property so no need to have a “With” structure.
Part 05:
Fifth part of the vba code set the font color property to red. This is also written inside a “With” statement. We don’t need “with” statement here.
And of course we already set some font properties in part 03. So it is better to set the font color property there as shown below.
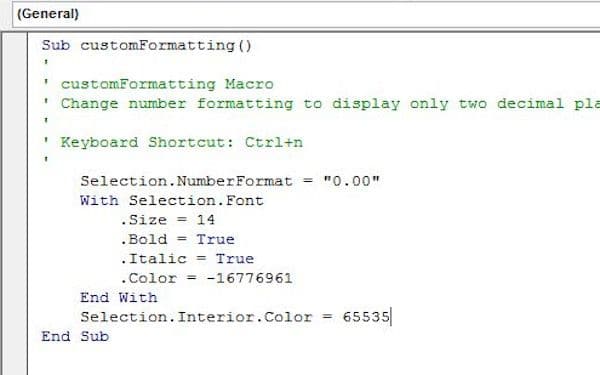
Final version has fewer amount of code than original version which automatically generated after recording the macro. This increase the performance of the macro.
Modify and add new functionality to excel macro.
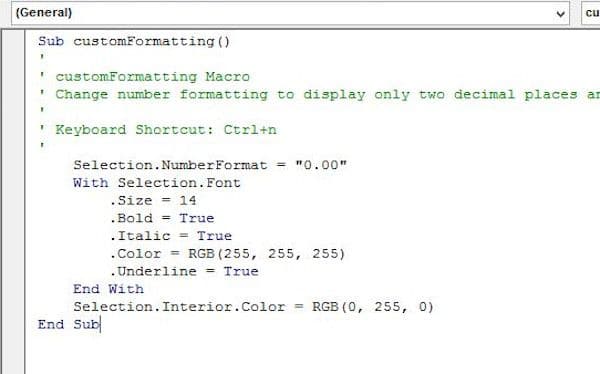
Let us say that you want change the background color to light green and font color to white.
What you have to do is just change the values for font color and interior color to respective excel color code. Vba uses a color code system called as “long”.
It is not very easy to find the values representing required colors in this format. Instead we can simply use RGB color system.
Find the RGB values for green and white.
We can safely assume green represented by (0,255,0) and white represented by (255,255,255).
It can be easily found the rgb color values of any color you want through the internet.
- Set the value for color property of the “font” to “RGB(255,255,255)”.
- Then set the value for color property of the “Interior” to “RGB(0,255,0)”.
RGB() function in vba converts the color given in RGB values to its “long color code” value.
Now say that you want to underline the fonts also.
Add a new vba code line inside the “With” statement for “Selection.Font” object as given below.
“.Underline = true”
Like that you can easily modify or add new functionality to a recorded macro. We will further discuss about vba codes in future tutorial.
If everything is okay, save your work and run the the modified macro following below steps.
- Go to “ File menu” → click “Save” or press “Ctrl” + “S”
- Now close the Visual Basic Editor.
You will be again in the excel work sheet you were working.
- Select the cell that you need to apply the macro.
- Go to “View” tab → “Macros” group → Click “Macros” button
- Then select your preferred macro from the list box and then click the “Run” button.
SHARE